Showing posts with label wedding. Show all posts

Saturday, 19 July 2014

Beaded bra straps

Please excuse the picture of my underwear but i'm quite proud of it!
The shape of the back of my wedding dress means that you can see a portion of my bar straps. Since going without any support is not an option i decided that if you can see them i'd better make them pretty!

 
So i used the little bag of spare beads you get with embellished dresses and embellished the part of the bra straps that you'll see. Now they look like theyre supposed to be there - hidden in plain sight!

Wednesday, 16 July 2014

Seating plan

This definitely means the wedding is nearly here - the seating plan is now fixed!
I just bought some purple mountboard, printed the tables and occupants on some coloured card and fixed them in place with some lovely lacey washi tape i found on ebay
Then i just embellished it with some dried lavender - to keep it in line with the theme!
Its all very real now!!! :)

Monday, 14 July 2014

Emergency kits

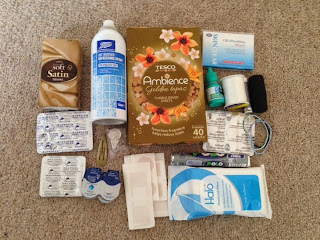
Ive put together some emergency kits for the wedding. This one is for the guest and us, it'll be in the toilets at the reception.
Deodrant (mens and womens), suntan lotion, hand wipes, chewing gum, dental floss, hand gel, insect repellent, moisturiser, hairspray, hair grips.

Then i'll have my own emergency kit, for me and lovely BM, just in case.
Iussues, cooling spray, static wipes, oil absorbing sheets, eyedrops, thread (white, grey and black), ibuprofen, paracetamol, hair clip, needle, spare contact lenses, plasters (various sizes), deowipes, mints, antihistamines, hair bands.

Hopefully that covers everything!

Thursday, 10 July 2014

Bleach 'dyed' bride tshirt

Ive seen a few of these bleached bride tshirts on the interweb so i thought id make my own to wear on the wedding morning


I just used a clorex bleach pen i bought off ebay. If you use one make sure you shake it well first and use it on a test piece first to get rid of the air bubbles - my B is a bit messy because of air bubbles.

Monday, 7 July 2014

Wedding Chalkboard


As our guests are arriving at our venue before us i thought id do a cute little blackboard letting them know the plan!

Sunday, 29 June 2014

Wedding prep!

The spare room is gradually filling with wedding shaped items!!! Squeee!!

Thursday, 12 June 2014

Chocolate wedding cakes make


Wedding cake number 2 (chocolate) is made - eek!
Only six weeks to go now so my blogging might be a bit sporadic from now on!

Sunday, 8 June 2014

Groom stubby holder


Little hand embroidered stubby holder for lovely BM for the big day! Im hoping he'll try and drink out of a nice glass but i like to plan for all alcohol consumption related situations!

Friday, 6 June 2014

Lace tip wedding shoes


My proper wedding shoes (the one for the photos, the ones ill be wearing once all that's done are here) are only inexpensive ones from a low cost shoe shop. But they arent exactly the right colour on the tip, theyre a bit too gold, i need them more silver. I though i might try spray painting them but just wasnt feeling it. So i thought id try and embellish them with some lace instead. I figured if i didnt like it i could still paint them. I just used pva glue and stuck the trimmed lace directly on the shoe leather (by leather i mean plastic!). I think theyve turned out pretty well :) i dont think theyd withstand much rain or even much use to be honest but theyll more than do for the big day! Im going to wear them around a bit and check it all stays in, if not i might paint them instead...

Monday, 2 June 2014

Wedding Card Trunk


While Lovely BM is off on his stag do i cracked on with wedding stuff! I spotted my Dad's old boarding school tuck box (off of Enid Blyton!) a little while ago and knew i wanted to use it at the wedding. I was going to line all the sides with fabric but i quite liked some of the ink stains so i decided to leave them uncovered. 
I just cut a piece of thick mount board the same size as the bottom and covered it with some cute purple flower fabric i already had and popped it in the bottom.


Then i made a really simple card banner for the top. I just cut the letters out of grey card, glued them to peach and lilac rectangles and then pegged them to some string. I juts draped that over the top and fixed it with a bit of tape - so easy and so cute!

Thursday, 29 May 2014

Wedding cake - fruit cake


The first real wedding cake, not a tester, has been made :) This is the one the guests will eat - eeek! 
The fruit cake needs to sit for a few months to develop its flavour and so we can feed it with brandy so ive made it 2 months ahead of the wedding. This is the one im not decorating myself so the caterer also wanted ti made sooner rather than later.
I made a 30cm cake mix but baked it in a 23cm tin as i wanted it tall rather than wide. Just make sure you 23cm tin has tall side or add extra lining paper above the tin height to contain the mixture while its cooking.
I used this recipe but swapped the raisins for dates and apricots as that's what my mum likes :) I also left out the treacle as i prefer a blonder fruit cake. I doesn't look like it from the picture but the middle will be fairly pale in colour for a fruit cake. Its all feeling very real now...

Tuesday, 27 May 2014

Sunday, 25 May 2014

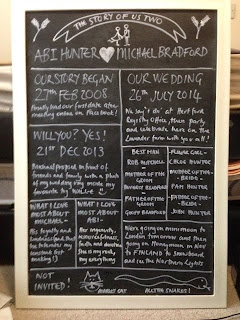
Story of Us Chalkboard


I turned and old picture frames into a story of us blackboard for the wedding! Even lovely BM thought this was very cool :)
I just painted the glass off the picture frame with chalkboard paint and then got to work with a chalkboard marker-i love how it turned out.


Friday, 16 May 2014

Confetti match books


I love confetti! But as we really can only throw organic confetti on the lavender farm i figured that if i wanted to be showered in the stuff on my wedding day then id better provide some for my guests. In addition ive saved every rose lovely BM has ever bought me (never could bring myself to chuck them!) so this seemed like a perfect opportunity to  use them. So i put the rose petals and also some (very local!) lavender in glassine bags, then stapled them to some cute match books i printed up. Im loving making all these little finishing touches for the wedding :)

Tuesday, 13 May 2014

DIY wedding veil

Continuing my DIY wedding theme i'm also making my own veil. I just bought a nice lace trimmed one, no comb, from etsy and bought some lovely metal combs from ebay - total cost about £12!

First i covered my comb in ribbon. This to make it pretty and so that you have something to sew the actual veil to. The ribbon is just wrapped in between every tooth.

This is the back with the beginning end tucked in
When you come to the end sew that end in place, dont break the thread and then you can attach veil straight away
I didnt want a gathered veil, i wanted a more waterfall style one so i just gathered my veil into a point and folded over the end to make it flat.

I then just sewed it to the ribbon on the comb. Above is the back. Below is the front

And the finished product! Its exactly the effect i was looking for - a cascading waterfall kind of look :)

Sunday, 11 May 2014

Wedding bouquet practise

Im making my own bouquet for my wedding so i though id have a practise! I just used cream roses and purple stocks from my local super market but it turned out great!


It was really easy to make, surprisingly easy to be honest, so im definitely going to make my own. Im going to wrap the stems in some lace from my mums wedding dress, so that'll be my something old and borrowed :)
I followed the instructions over at Blooms by the Box which were fabulous - just wished then sent their flowers to the UK!

Thursday, 8 May 2014

Practise Wedding Cakes

I had a practise run for my wedding cakes!
Im making 4, the fruit cake isnt shown as someone else is decorating that


This is them with their crumb coat - they always look so cute like this i think, all new and yummy!


This is the red velvet with toasted marshmallow frosting. I stupidly forgot to take a picture of this one cut - doh! Its totally the most dramatic :(
Anyway i used this Nigella recipe for red velvet cupcakes, just made it as a cake, and this marshmallow frosting. I spread the frosting smoothly on the sides and then piped little mini meringues on the top and then toasted it all with a blow torch


The chocolate fudge cake - by far the most popular! Its a fab recipe, again by Nigella, which ive been making for years. i love it because it isnt too sweet, and it has a really fudgey texture without being heavy. This one is topped with basic chocolate butter cream piped as roses. Its really just a swirl, piped with a large star tip nozzle. Its really easy but looks like its really complicated!


Any finally this is a lemon cake with lemon swiss meringue buttercream
Yet again, a nigella recipe, i just doubled the quantities for her Lemon Drizzle cake. The topped it with this amazing swiss meringue buttercream. Ive never made it before and it does take a little while but it sreally delicious, and very stable, which i great for a summer wedding. This was supposed to be a little better finished off but i ran out of steam somewhat on the third cake! Something to consider when making the real things...


Makes me hungry just remembering them!

Wednesday, 30 April 2014

Cake toppers - crochet hearts


More cake toppers! Little crochet hearts (pattern here) stuck on wire, i used a bit if glue to fix them to the wire otherwise they spun round like weather vane!
 

I also remade the wire word cake topper, with long legs to stick it into the cake this time
Heres the whole selection! Well theres actually one more (4 cakes, i know, a bit ridiculous!) but number 4 isnt finished yet - watch this space!

Monday, 28 April 2014

Hessian 'Just Married' Banner (including a how to)


More decorations for the wedding! A hessian 'just married' bunting style banner. 

I just cut out 12 rectangles of hessian, twice a long as i wanted the finished size to be. I folded them in half long ways.
Then i sewed the three open side closed, but left 2cm open on the longer sides, at the folded end (this is to thread the string through). The edges are exposed as I was going for the rustic look

Then, with a sharpie, i just drew the letters on, its hessian and pretty rough so the drawing doesn't have to be accurate. I used a heart in the space rather than leave it blank. I then threaded some string through each letter - hey presto a banner!