Showing posts with label pattern. Show all posts

Thursday, 3 April 2014

Crochet Lavender Pattern


I was going to have traditional button holes but the cost of them freaked me out a bit so i decided to make my own. After after not really finding anything flower based that i liked and that i could do myself, but loving this knitted lavender buttonhole, i decided that was the way to go. Ive yet to decide on the final look of the buttonholes but i wanted to get started on the lavender flowers asap.

So I found this cute lavender pattern but then managed to lose one of my set of dp needles and was so miffed about that that i refused to buy a new set (childish but true!). So i decided to try my own pattern but crochet them and this is what i ended up with
NB you need to know how to crochet i cord, this video is brilliant


I used Sirdar Sublime wools
Subline Luxury Aran Tweed in 365 Vineyard for the stalk
Subline Luxury Aran Tweed in 269 Indigo Tweed for the more mottled Lavenders
Sublime Baby Cashmere Merino Silk DK in 160 Rubadub

Pattern
With lavender head wool and 3mm crochet hook
Chain 2
Rnd 1: 3 dc in 2nd dc in chain (3), join in the round
Rnd 2: 2 dc in each dc (6)
Rnd 3-9: dc in each dc (6)
This is your lavender head, do more or less rounds for a longer or shorter head


Your now going to swap to stalk coloured wool and swap from crocheting in the round to crocheting icord
NB. If you're able to crochet 3 stitches in the round them feel free to continue with that method but that's far too fiddly for me and i have to do icord
For icord you need to have 3 stitches on your hook, rather than the usual 1. So we're going to decrease the round from 6 stitches to 3 but leave all 3 on the hook

Continue in the round but with stalk coloured wool
Rnd 10: 2dctog

(1 dc left on hook)


Rnd 10 cont. 2dctog but only pull through 2 loops

(2 dc now on hook),


Rand 10 cont: 2dctog but only pull through 2 loops

(3 dc now on hook)


Rnd 11-19: work as icord (3)

(pic after 2 rows of icord)
Rnd 20: bind off
Weave in the ends and your finished :)

To make the stalk a bit harder im experimenting with pipe cleaners and lollipop sticks!


Friday, 24 January 2014

Multicoloured crochet taxidermy rhino

My latest bit of crochet taxidermy. This was a present for my sister's birthday but to be honest he nearly didnt make it in the post to Australia as i wanted to keep him for myself! 
If you want to make your own the pattern is for sale in my etsy shop


Friday, 10 January 2014

Crochet play food

These still make me laugh everything I look at them, especially that slice of bread! Crochet food just tickles me for some reason!
Anyway my cute niece has a little play kitchen and loads of food so I thought id add some more to the pile, but crocheted!
The bread, the carrot and the orange patterns are from pierrot yarns.
The egg pattern is from monstercrochet
The ice cream pattern is from bruised weasel

Saturday, 26 October 2013

Knitted Ducks


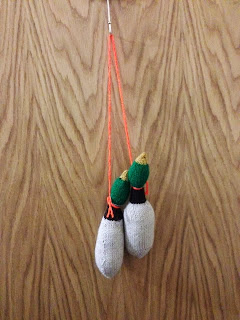
Lovely BM went on a stag do recently and the theme was 'country gent'. Now I love a bit of fancy dress as its a great excuse to make something. I knew immediately i wanted to make him a brace of pheasants (nothing says countryside more than a couple of dead game birds slung over your shoulder!) but couldnt find many pheasant patterns online (who'd have thought!) Then i found these duck dog toys on ravelry and figured theyd be an excellent substitute. So i make a pair, joined then with knitted bailer twine and lovely BM was ready to go! They even made it back home with him with was nothing short of amazing!

Tuesday, 13 August 2013

Crochet basket

 
Check out the cute crochet basket i made! I used this pattern from Ravelry- dont you just love the ombre version on the pattern! It was super easy to make and you can use regular wool you just use 4 strands of it at the same time. Im definitely going to make some coloured ones next :)

Tuesday, 6 August 2013

Adding colour - simple DVD tower make over

I love all the ideas out there about adding colour to the inside of furniture

Like this from House to Home


And this from iheartorgainsing


I wanted to do something myself but wasnt keen on the idea of it being permanent so shied away from painting. So i followed House to Homes suggestion of using wallpaper. I also decide to not attach the wall paper permanently so i could change it if i didnt like it.

So this is what i was trying to liven up, our 4 Ikea Benno DVD towers. Nice but very plain.

And this is what i ended up with - so much better!


I just used wallpaper samples i got from the local DIY shop, cut them to match and slid them inside the DVD towers. I took the back panel off one of the stands and used that to cut everything to the right size, so there was not constant re-trimming needed! The items in the shelves mostly hold the paper in place but i used some repositional glue dots where they werent so secure.


This is what they look like in use. I just love them, its such a subtle way of adding colour and pattern to a room and even better it was free!!!


Friday, 23 March 2012

Teeny Tiny Stuff

A project im working on has needed some teeny tiny little things

Little tiny knitted sheep, adapted (made smaller and didnt do the loop stitch ) from this Lion Brand pattern
 

Tiny fimo ruler


Tiny felt drinks


Teeny tiny stuff is just too cute!!

Wednesday, 15 February 2012

Screen Print Cushion Tutorial

I blogged about this tutorial for screen printing without a screen over at The Creativity Exchange before and lovely BM and i needed some new cushion covers so i had a go at making them this weekend

I just used some basic cream drill cotton i bought from ebay. Id recommend a good thick fabric for cushions, like a drill, as it needs to be quite durable. I measured around my cushion, and cut my fabric to the same width and 2.5 times the length, with an additional 5-10cm seam allowance.

Then i laid out the pattern i wanted in tape in the centre of my fabric, trying to make it as symmetrical as possible. This was the most difficult part, i love the geometric shapes and they only work if theyre exact so there was a lot of measuring and calculating involved, but i quite enjoyed it really. I used frog tape, just got it from B&Q, as i think it's much better for stopping paint bleeding under the tape.

I bought some screen print paint from my local art shop. Its important the you use paint that doesnt bleed or you wont get the crisp straight line that looks so good so I tested my paint on a bit of scrap fabric first to make doubly sure.
Then i just painted in the areas i wanted, i did 2 coats to make sure i got even coverage, letting it dry fully in between coats.

Then the fun bit is pulling off the tape and seeing what youve created! I loved how mine turned out and the colour is nice and opaque which is what i wanted.


I ironed the cushion covers to set the paint, but check your paint to see what you need to do to set it. Then i made then up into cushions following the instructions on The Creativity Exchange's tutorial.


There's already in use on our sofa and I'm loving them. I'm not sure how washable they are so i just need to try and keep Marley cat and his giant muddy paws away from them!

Friday, 27 January 2012

Knitted Dissceted Rat

I couldnt resist buying this pattern when i saw it on etsy. Its another combination of the things i love, science/biology and crafting. I found it on etsy in The Crafty Hedgehog's shop and i cant wait to make it!

Sunday, 15 January 2012

First full make of the year! Basket weave blanket


Finally! My first proper make of the year! I wanted a chunky blanket to cover myself with when Im lying on the sofa so after a bit of surfing inspiration I designed this one my self. I'm so pleased how it turned out, the wool is really snuggly and I love the colour.

Wool/yarn: RICO Fashion Super Chunky in grey, 005, I used 7 balls
Size: 112cm (44") by 135cm (53")
Needles: I used a 22mm circular needle but used it as single needles, ie don't connect in the round

Pattern
Cast on 76
Rows 1 to 4: knit
Rows 5 to 12: k6, (k8,p8) repeat 4 times, k6
Rows 13 to 20: k6, (p8,k8) 4 times, k6
Repeat rows 5 to 20 16 more times or until blanket is the size you want
Final 4 rows: knit
Cast off
Weave in ends

If I make it again I might make the top and bottom borders a bit longer to match the side borders, ie increase the number of knit only rows at the beginning and end, but I was worried about not having enough wool so I left them narrow.


Monday, 9 January 2012

Handmade handbag

OK so I've not actually posted anything I've made on here yet, but I am working on stuff, mainly a big knitted blanket/throw which should be finished soon - pictures to follow. So instead I thought I'd post about the stuff I really want to make this year.
Lisa over at U-Handblog gives away her some of amazing handmade handbag patterns for free. The instructions are really clear and you can buy all the bits you need from her online shop, u-handbag.com, as well. She has some lovely leather handbag handles that I haven't been able to find anywhere else. I tried making her For Pleat's Sake Tote last year but got all my measurements messed up and it was a bit of a disaster! I'm also not the neatest and most accurate of sewers so it was even more wonky because of that! So this year I'm going to try again. I've bought some gorgeous brown leather handles from u-handbag, some cute Michael Miller Bonehead Fabric in grey for the outside and some fifties inspired blue fabric for the lining. I'll post photos once I'm done...